Wheelgun Wednesday: Wadcutter Workups

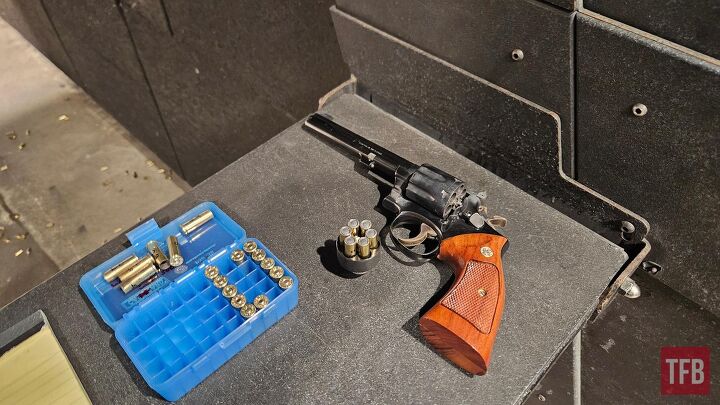
My local CMP-affiliated shooting club recently announced a full slate of bullseye pistol matches this summer. I have dabbled previously and plan on jumping in with both feet this year to work on my various distinguished pistol ranks. But that means I needed a good target revolver and ammo to go with it. So here is some info from my first go at loading .38 wadcutters for match use.
Wheelgun Wednesday @ TFB:
- Wheelgun Wednesday: Booligan's Muzzle Loader Modernized
- Wheelgun Wednesday: Collectable Revolvers To Buy - Part 2
- Wheelgun Wednesday: Colt Anacondas Blued, Optic Ready & Enhanced Grips
- Wheelgun Wednesday: The Evolution of Magnum Revolvers
- Wheelgun Wednesday: Ruger New Model Blackhawk Convertible
Background
Wadcutters have long been associated with target pistol shooting. They fly well at reasonable target distances, and they punch beautiful, clean holes in targets for easy scoring. Wadcutters are most commonly a lead projectile. There are plated and powder-coated options as well, but classic swaged lead is the most prevalent type.
There are two main types of wadcutter projectiles. Double-ended wadcutters are a true cylinder, closed on both ends. There is no front or back on these bullets. That simplifies the loading process because they can go into the case without regard for the front or rear.
The other main kind of wadcutter has a hollow base. These tend to be the more popular option with the pistol accuracy crowd. The gap at the base of the bullet, known as the skirt, expands with the gas pressure to fill the bore and make a consistent seal. They need to be placed correctly during loading, but it is easy to get them pointed the correct way.

Loading Process
Loading wadcutters feels a little different than other kinds of pistol ammo. They sit all the way in the case, flush with the mouth. I was worried before I tried it that my dies would not work, but running the seater down on my Lee dies successfully pushed the bullet down flush with the case. My cases were prepared with adequately flared mouths, but missing that step would make for problems. A trip into the Lee factory crimp die holds everything in place.
One other thing to keep in mind is safety with the very light powder charges these loads use. Less than three grains of powder is very common, meaning that a double, triple, or even quadruple powder charge would fit in a case without overflowing. My loading process involves charging the case, then seating the bullet before moving to the next round, never setting down a case containing powder.

Gallenson’s Guns had some Speer 148-grain hollow base wadcutters in stock, so I bought some of those for this initial test. The classic powder for this kind of load is Bullseye, but that has become impossible to find. Many shooters have experimented with replacement powder options, and there are several popular options. Two of these, Winchester 244 and Hodgdon Titegroup, happened to be on my powder shelf, so I started there.
DO NOT DUPLICATE ANY LOAD INFORMATION YOU SEE HERE. YOU ARE RESPONSIBLE FOR THE SAFETY OF YOUR OWN LOADS. ONLY USE PUBLISHED DATA AND INSPECT ALL COMPONENTS FOR SAFETY.
The goal with bullseye ammo is precision, but reduced recoil is an advantage in the rapid-fire stage. Seeing as this is a revolver, there are no concerns about cycling the gun with light loads. I started at the minimum powder loads listed in the Hodgdon reloading data center for both Titegroup and 244, and loaded up ammo at 0.1 grain increasing powder charges with mixed headstamp brass and CCI primers. I shot these from a 6-inch Smith & Wesson Model 14 over a Garmin Xero C1 chronograph.
Titegroup:
| POWDER CHARGE | AVG VELOCITY | ES | SD |
| 2.7 Grains | 683 FPS | 85 FPS | 29 FPS |
| 2.8 Grains | 721 FPS | 67 FPS | 22 FPS |
| 2.9 Grains | 752 FPS | 46 FPS | 16 FPS |
| 3.0 Grains | 764 FPS | 58 FPS | 23 FPS |
| 3.1 Grains | 781 FPS | 42 FPS | 13 FPS |
| 3.2 Grains | 794 FPS | 85 FPS | 30 FPS |
244:
| POWDER CHARGE | AVG VELOCITY | ES | SD |
| 2.5 Grains | 641 FPS | 69 FPS | 24 FPS |
| 2.6 Grains | 653 FPS | 57 FPS | 22 FPS |
| 2.7 Grains | 680 FPS | 46 FPS | 16 FPS |
| 2.8 Grains | 697 FPS | 83 FPS | 30 FPS |
| 2.9 Grains | 710 FPS | 93 FPS | 32 FPS |
| 3.0 Grains | 738 FPS | 80 FPS | 29 FPS |
| 3.1 Grains | 761 FPS | 17 FPS | 6 FPS |
I did not shoot these initial batches of ammo for groups. This first test was about identifying the general velocity ranges these powders would produce in my gun. I was getting used to the gun and rough-adjusting the sights rather than shooting for group size. High velocity is not the goal. These are lead bullets, and they will leave too much lead residue in the bore if they are pushed too fast. The real goal is consistency, with more testing to come using consistent headstamp brass.
This is very affordable ammo, too. Using current prices at my local Scheels, here is a breakdown using the brass I already have:
Small pistol primer: $50/1000 = 5 cents
3.0 grains of Titegroup: $43/lb = 2 cents
Projectile (from Gallensons): $54/500 = 11 cents
That is 18 cents per round, so a 50-round box of ammo costs $9 if you don’t factor in reloading equipment or time.
On The Range
Shooting wadcutters is a hoot. There is almost no recoil. The bullets punch perfect little circles in the target paper. The picture of the target below shows the first shot I took with one of the loads. Note how crisp that circle cutout is through the X! I am a novice at shooting a bullseye revolver, so I have been learning position, getting used to the gun, and seeing if I shoot better with double action or single action in the rapid fire stages. Having very cheap and low-recoil ammo also being the most accurate option is extremely convenient.


Terminal Ballistics
I could not resist the urge to do a little redneck ballistic testing. I brought a few gallon jugs of water to the range to see what the wadcutters would do to them. The first test was three jugs in a row. Much to my surprise, the bullet penetrated all three and exited! That was unexpected, but all hope was not lost.
Two of the previously-shot jugs had small punctures and were still about half full. I had one more full jug, and I put that one in the front and a sandbag behind the last jug to catch the bullet. It did not seem to be carrying much energy at the exit point because the last exit opening was not much larger than the bullet. This second test has similar results, with the bullet exiting the third and stopping in the top layer of sand.
This recovered bullet was almost indistinguishable from an unfired projectile but for the rifling marks. It had mushroomed ever so slightly, mushrooming from the nominal .358 inches to just .371 inches. The recovered weight was 147.9 grains, within the expected variance of unfired bullet weights, for 100% weight retention. Some old-timers talked about loading wadcutters backward so maybe I’ll try that in the future.


Conclusion
Wadcutters are something of a novelty these days, but they remain in use for good reason. They are very accurate and easy to shoot well. And if your main objective is punching a clean little hole in a target, these bullets work just as well as they did in the 1920s.
AKA @fromtheguncounter on Instagram. Gun nerd, reloader, attorney, and mediocre hunter.
More by Daniel Y


![[SHOT 2026] Modular Frames for Glock pistols from Geisler Defence](https://cdn-fastly.thefirearmblog.com/media/2026/01/22/05161/post.jpg?size=350x220)


![[SHOT 2026] Pietta Blacktooth Python Clone Confirmed - More Revivals!](https://cdn-fastly.thefirearmblog.com/media/2026/01/23/02561/post.jpg?size=350x220)


Comments
Join the conversation
It is not necessary to seat wadcutters below the case mouth. True, the S&W 52 demands this. But, in competition, I shoot both revolver and pistol with lead exposed. In my K-38 I seat the HBWC with its face protruding .115" from the case mouth. Testing proved this to be most accurate position. For Precision Pistol (aka "Bullseye") I shoot a 1911 modified for .38 Special. For it I seat a custom 141 grain button-nosed wadcutter atop a light load of N-310. The bullet protrudes .041" - flush seating the bullet is less accurate. Plus the exposed lead seems to improve feed reliability.
So, start with flush seating, but test with exposed lead. You may find it's better.