How to Clean Your AR-15: A Complete Guide


Keeping your AR-15 clean is essential for reliability when you need it most. A properly maintained rifle will function flawlessly and prevent premature wear on critical components. While there are different cleaning philosophies out there, this guide will provide you with a proven approach that works for both casual shooters and serious enthusiasts.
More AR-15 Content @ TFB:
- Best AR-15 Upgrades
- The Best Beginner AR-15
- Best Optic for the AR-15
- The Best Suppressor For The AR-15
- Best AR Pistols
- Best AR-15 Charging Handles for 2025
- Best AR-15 Cleaning Kits
- AR Barrels, Explained
- How to Choose the Ideal Twist Rate for Your AR-15
- Best AR-15 Slings
- The 5 Best AR-15 Tools for Your Gun Bench in 2025
Why You Need to Clean Your AR-15
The AR-15 has a direct impingement system (most of them anyway), which means it basically craps where it eats. Gas blows carbon and crud right back into the action.

Here's why cleaning matters:
- Reliability: Carbon buildup loves to cause malfunctions at the worst possible time
- Accuracy: A fouled barrel doesn't shoot its best
- Longevity: Some of these rifles aren't cheap - take care of your investment
- Rust prevention: Moisture and gun metal don't mix (at least the steel bits)
How Often Should an AR-15 Be Cleaned?
I get this question all the time, and honestly, it depends. Here's my rule of thumb:
- After a generic range trip (50-100 rounds): A quick wipe-down of the BCG and a bore snake through the barrel
- Every 300-500 rounds: More thorough cleaning
- After shooting in rain, snow, or dusty conditions: Clean it that day
- For defensive guns: Clean after every range session, no exceptions
Look, some guys brag about running thousands of rounds without cleaning. Their rifles might run fine. But if I'm betting my life on it, I'll take the clean one.
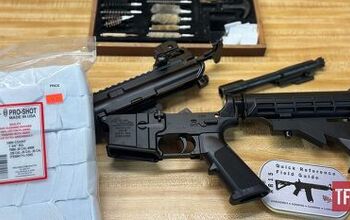
Tools Needed
Essential Tools

- Cleaning rod or bore snake (.223/5.56mm): The foundation of your cleaning kit. Cleaning rods should be coated to prevent barrel damage.
- Bore brush: Get the correct caliber (.22 for 5.56mm) - brass or bronze is preferable to steel.
- Chamber brush (star-shaped): Essential for cleaning the star chamber and locking lugs where carbon builds up heavily.
- Nylon utility brushes or old toothbrush: For scrubbing carbon from hard-to-reach areas without damaging aluminum surfaces.
- Cotton patches or clean rags: Used with solvent for cleaning and with oil for lubricating. White patches show when fouling is completely removed.
- Cleaning solvent (like Hoppe's No. 9): For dissolving carbon, copper, and lead fouling from the bore and action.
- Lubricant/Protectant (CLP or G96): For lubricating moving parts and protecting against corrosion.
- Cleaning mat: Provides a clean work surface and prevents losing small parts. Many have diagrams showing parts placement.
- Disposable gloves: Protect your hands from solvents, oils, and lead residue.
- Cotton swabs: Perfect for reaching tight spaces like the fire control group and small recesses.
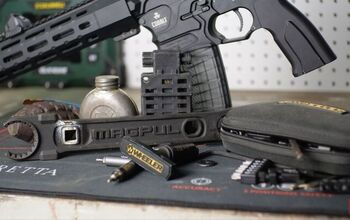
Optional Tools
- AR-15 specific cleaning tools (bolt carbon scraper): Makes removing stubborn carbon deposits much easier, especially from the bolt tail.
- Vise block: Secures the receiver in a bench vise without damaging it, allowing for better access and stability during cleaning.
- Punches: Helpful for detail disassembly and reaching into tight spaces.
- AR multi-tool/wrench: Useful for removing stubborn components or adjusting the castle nut if necessary.
- Dental picks: Excellent for removing carbon from tight areas like the extractor.
- Ultrasonic cleaner: For deep cleaning of heavily fouled parts. Particularly useful for the bolt carrier group.
- Magnifier or inspection light: Helps identify small issues or remaining carbon deposits.

Having the right tools makes cleaning faster, more effective, and less frustrating. While you don't need to buy everything at once, gradually building a comprehensive cleaning kit will make maintenance easier and more thorough.
Bore Brush vs. Bore Snake
This is a long debated topic. Especially since militaries from around the world have utilized bore snakes for a long time while the commercial market has pushed the brush/rod setup to average joe for just as long. Each has its place in your cleaning kit.
Bore Brush/Rod
- Pros: More aggressive cleaning, better for removing heavy fouling and copper deposits
- Cons: Takes longer, requires additional components
- Best for: Thorough cleanings or when the barrel is heavily fouled

Bore Snake
- Pros: Quick and convenient, all-in-one design, portable for field use
- Cons: Less thorough, wears out/rips/tears over time
- Best for: Regular maintenance after normal shooting sessions

Cleaning Your AR-15: Step by Step
Before beginning any cleaning process, ensure your rifle is completely unloaded by removing the magazine and visually and physically checking the chamber is empty. As a safety precaution, remove all ammunition from your cleaning area to eliminate any unfortunate possibilities. Next, lay out all your cleaning supplies on a mat or protected surface so everything is organized and within reach. Finally, put on safety glasses to protect your eyes from cleaning solvents and small parts that might spring free, and wear disposable gloves to protect your hands from harmful chemicals and lead residue.
AR-15 Disassembly/Reassembly Resources:
- TFB Armorer's Bench: Complete AR15 Disassembly - Bolt Carrier Group
- TFB Armorer's Bench: Complete AR15 Disassembly - Upper Receiver
- TFB Armorer's Bench: Complete AR15 Disassembly – Lower Receiver
- TFB Armorer's Bench: Complete AR15 Assembly - Upper Receiver
- TFB Armorer's Bench: Complete AR15 Assembly - Lower Receiver
Basic Disassembly
1) Separate upper and lower receivers
- Push out the takedown pins (front and rear)
- Pull the receivers apart vertically
- If pins are tight, use a punch to assist.

2) Remove the charging handle and BCG
- Pull the charging handle back about an inch
- Grasp the bolt carrier group and remove it from the rear of the upper receiver
- Pull the charging handle back and down to remove it from its channel
- Be careful not to drag the charging handle against the upper receiver, which can cause premature wear

3) Disassemble the BCG
- Remove the firing pin retaining pin (the small cotter pin on the left side)
- Tilt the carrier to allow the firing pin to slide out the rear
- Push the bolt forward into the carrier
- Rotate the cam pin 90 degrees and lift it out
- Pull the bolt forward and out of the carrier
- For deep cleaning, push the extractor pin out using a punch and remove the extractor and spring

Each component should come apart with minimal resistance. If something feels stuck, stop and reassess - forcing parts can damage them. Keep small parts organized on your cleaning mat to prevent loss. Taking photos during disassembly can help with reassembly if you're new to the platform.
Deep Cleaning Process
Upper Receiver and Barrel
- Use the chamber brush to clean the star chamber and locking lugs
- Run a solvent-soaked bore brush through the barrel (chamber to muzzle, always)
- Follow with patches until they come out clean
- Clean the upper receiver interior with a nylon brush
- Pay special attention to the gas tube connection area
- Wipe everything down with a clean cloth
Bolt Carrier Group
- Soak the BCG components in solvent
- Scrub the bolt face and lugs with a nylon brush
- Clean the extractor and check spring tension
- Scrub the carrier, especially the gas key
- Clean the firing pin and cam pin
- Wipe all components dry
Lower Receiver
- Brush around the trigger group
- Clean the buffer and spring
- Wipe down the magazine well
- Clean the takedown pin recesses
- Dry everything thoroughly
Quick Clean Process
For faster cleaning after a standard range session:
- Separate upper and lower
- Remove BCG and charging handle
- Run a bore snake through the barrel 2-3 times
- Wipe down the BCG
- Clean the bolt face and lugs
- Apply proper lubrication
- Reassemble
Proper Lubrication
What Parts to Oil
Bolt Carrier Group
- Bolt body - especially where it slides in the carrier
- Bolt lugs - light coat
- Cam pin - moderate amount
- Carrier rails - where it contacts the upper receiver
- Gas rings - just a light touch

Upper Receiver
- Interior rails where BCG rides
- Charging handle rails (lightly)
- Forward assist (if equipped)

Action Parts (Optional/Minimal)
- Trigger pins (VERY sparingly)
- Buffer spring
- Buffer tube interior
- Takedown pins
What Parts NOT to Oil
- Gas system: Keep gas tube and block clean and dry. Oil here burns under high temperatures, creating carbon deposits that cause cycling issues.
- Firing pin and channel: Oil causes hydraulic resistance, leading to light primer strikes.
- Chamber and barrel bore: Should remain clean and dry. Oil can cause pressure spikes, accuracy issues, and in extreme cases, bore obstructions that can damage the barrel.
- Fire control group: The trigger mechanism needs minimal lubrication. Excess oil attracts dirt that interferes with precision engagement surfaces.
- Magazine components: Oil attracts dust and debris, causing feeding issues.
Remember: apply a light sheen, not a dripping coat. Over-oiling attracts dirt and can create a paste-like substance when mixed with carbon.
Carbon Buildup Problem Areas
These spots require extra attention during cleaning:
- Bolt Tail: The rear of the bolt collects heavy carbon buildup where it interfaces with the bolt carrier. This area affects cycling reliability and should be scrubbed thoroughly. Stubborn carbon here can be loosened with a brass brush or dedicated carbon scraper.
- Gas Key: Both inside and on top of this component collect significant carbon. The interior channel carries hot gas directly from the gas tube and becomes heavily fouled. Use a pipe cleaner or small brush to clean inside. Check that the gas key screws remain properly staked.
- Locking Lugs: Where the bolt locks into the barrel extension collects carbon that can affect lockup reliability. The star chamber brush is specifically designed to clean this area. Pay attention to all surfaces of the lugs as carbon here can prevent proper lockup.
- Extractor: Carbon hides underneath this component and can affect extraction reliability. Remove the extractor during deep cleanings and clean the spring and the recess. A weak or dirty extractor is a common cause of malfunctions.
- Firing Pin Channel: This area collects fine carbon that can impede firing pin movement. With the firing pin removed, use compressed air or a pipe cleaner to clean this channel. Avoid using liquid cleaners that might remain trapped inside.
- Ejector: The ejector and spring in the bolt face collect carbon and brass shavings. Depress the ejector and clean around its base. A weak or sticky ejector causes stovepipe malfunctions.
- Firing Pin: The tip and body can collect carbon that causes light primer strikes. Clean thoroughly but do not lubricate heavily as oil here can cause misfires.
- Chamber: The chamber itself needs proper cleaning to prevent extraction issues. Use a chamber brush with solvent, followed by dry patches. Residue here can cause stuck cases.
Carbon buildup is progressive – the more rounds fired, the more carbon accumulates. Regular cleaning prevents it from hardening and becoming more difficult to remove. Some areas like the bolt tail and locking lugs should never be neglected as they directly impact reliability.
Gas System Maintenance
Often overlooked but critical for reliability:
- Check the Gas Block: Ensure it's secure. A loose gas block causes inconsistent cycling since it not perfectly over the gas port.

2. Inspect the Gas Tube: Look for obstructions or carbon buildup at the receiver end. Buildup restricts gas flow.

3. Gas Key Staking: Verify the gas key screws remain properly staked. Loose screws cause gas leakage.

4. Gas Rings Test: Stand the BCG on its bolt face - if it collapses under its own weight, the gas rings need replacement. This is not an end all, beat all test but typically if it is capable of collapsing without hesitation the OD of the rings has worn down.
See also: TFB Armorer's Bench: AR15 Gas Rings and Their Maintenance

Lubricants and Cleaning Products
I have covered this topic in depth in a TFB Armorer’s Bench on Gunsmithing Liquids. If you want all the spicy and well informed opinions check out that dissection!
Recommended Products
Cleaning Solvents
- Hoppe's No. 9: Effective for powder residue and light carbon
- Shooter's Choice MC7: Stronger solvent for heavy carbon buildup
- Foaming Bore Cleaners: Cling to surfaces for better cleaning action

Lubricants/Protectants
- Break-Free CLP: Good all-around product for cleaning, lubricating, and protecting
- G96: Similar to CLP with a more pleasant smell
- Specialized Gun Oils: Hoppe's, Lucas, Slip 2000 EWL
- Grease: For high-friction areas like the cam pin

Application Strategy
- For cleaning: Hoppe's No. 9 for the bore, followed by a dry patch
- For lubrication: CLP or G96 on moving parts
- For storage: Light coat of protectant on all metal surfaces
Products to Avoid
- WD-40: It's a Water Displacement formula, not a lubricant. Dries out and leaves sticky residue.
- Household cleaners: Can damage aluminum components and finishes.
- Chlorinated brake cleaner: Can damage finishes and create toxic fumes when heated.
- Regular motor oil: Lacks proper additives for firearms.
- Abrasive cleaners: Damage critical surfaces and dimensions.
- Silicone sprays: Attract dust and create stubborn residue.

Environmental Considerations
Dusty Conditions
- Use minimal oil - dust combines with oil to create an abrasive paste
- Consider dry lubricants that won't attract particles
- Clean more frequently as dust works into moving parts
- Pay extra attention to ejection port and magazine well (dust cover isnt there for looks)
Cold Weather
- Standard oils thicken in freezing temperatures
- Switch to synthetic oil rated for low temperatures
- Apply thinner coats than normal
- Watch for condensation when bringing a cold rifle inside
Humid Areas
- Wipe down metal surfaces weekly even if unused
- Store with desiccant packs
- Clean immediately after salt air exposure
Long-Term Storage Guidelines
If storing a rifle for months or longer:
- Clean thoroughly, focusing on bore and chamber
- Apply light coat of preservative oil to metal surfaces
- Store in cool, dry place with stable humidity (under 50%)
- Position horizontally or vertically with muzzle down (excess oils fall back into the action if stored muzzle up)
- Use silicone-treated gun socks or VCI products
- Check every 3-6 months for signs of rust and add protective oil as necessary
Application-Specific Maintenance
Home Defense Rifles
- Reliability is paramount - clean regularly even if unfired
- Monthly inspections at minimum
- Moderate lubrication that won't migrate
- Function test after every cleaning
- Rotate ammunition annually

Competition Rifles
- Clean after every match
- Pay extra attention to the trigger group
- Check gas system thoroughly
- Use higher-quality lubricants
- Keep records of round count and maintenance

Precision AR Builds
- Thorough bore cleaning with copper solvent
- Focus on the crown and chamber
- Check all mounting hardware
- Use minimal oil in precision areas

Reassembly and Function Check
- Reassemble the BCG in reverse order of disassembly
- Insert charging handle and BCG into upper receiver
- Connect upper and lower receivers
- Perform a function check:
- Verify safety works in both positions
- Check trigger reset
- Test charging handle operation

Common Mistakes
- Over-oiling: Creates a sticky mess that attracts dirt
- Under-cleaning: Especially the chamber and locking lugs
- Using inappropriate products: Household cleaners, WD-40, etc.
- Cleaning from the muzzle: Always clean from chamber to muzzle
- Neglecting the gas system: Until cycling problems occur
- Using steel brushes on aluminum: Damages the finish
- Skipping function checks: Critical for reliability
Frequently Asked Questions
How Long Can an AR Go without Cleaning?
Modern ARs can run 1,000+ rounds between cleanings, but regular maintenance is recommended. For a defensive rifle, clean after every use.
Should I Oil the Rifle Barrel After Cleaning?
No. The barrel bore should remain clean and dry. Oil in the bore can cause pressure spikes, accuracy issues, and potentially dangerous conditions. Oil acts as a bore obstruction. The exception may be for long-term storage, but this oil must be removed before firing.
Can You Over-Clean Your Rifle?
Yes. Excessive cleaning with aggressive tools can cause premature wear. Clean as needed based on use and conditions.
Can I Clean My Gun with Just Gun Oil?
CLP products can handle light cleaning, but for thorough maintenance, use a dedicated solvent followed by proper lubrication. CLP is the 3 in 1 shampoo of gun liquids. It does all jobs but its better off as a lube or a protectant.
What About Brake Cleaner?
Non-chlorinated brake cleaner can be effective for degreasing and for cleaning carbon but should be used cautiously. It removes ALL oils and can damage some finishes. Always re-lubricate thoroughly after use.

Conclusion
There's no one-size-fits-all cleaning schedule for AR-15s. Your maintenance routine should reflect your shooting habits, environment, and the rifle's purpose. A moderate approach works best - neither obsessing over every speck of carbon nor neglecting basic care.
Remember, cleaning isn't just about removing carbon - it's your opportunity to inspect parts for wear, check for loose components, and ensure everything functions properly. Think of it as preventative maintenance, not just cleaning.

A well-maintained AR-15 provides reliable service and better accuracy when it counts. Develop a consistent routine, use quality products, and your rifle will reward you with years of dependable performance.
Managing Editor: AllOutdoor.com | Staff Writer: TheFirearmBlog | Certified Gunsmith | Published Author | Firearm History Enthusiast
More by Sam.S


![[SHOT 2026] Name Game And New Features: Henry Rifle Lineup Evolves](https://cdn-fastly.thefirearmblog.com/media/2026/01/19/21081/post.jpg?size=350x220)
![[SHOT 2026] US Palm EOS Series Suppressors Debut 3D-Printed Lineup](https://cdn-fastly.thefirearmblog.com/media/2026/01/28/22251/post.jpg?size=350x220)


![[SHOT 2026] Bronco Arms SPAS12 "Clone"](https://cdn-fastly.thefirearmblog.com/media/2026/01/21/02091/post.jpg?size=350x220)

Comments
Join the conversation
This article is a perfect explanation/example as to why the gun cleaning industry has unnecessarily grown to a multi-billion dollar industry.
Some good advice, but it does irritate me when the platform is called a direct impingement. It is an internal piston that uses a stationary bolt and movable cylinder. There is a big difference between the two.. The AR does not need anymore cleaning than other platforms, but what it does require is more lube. Over cleaning the AR platform has destroyed more rifles than actual use. If the platform is kept lubed, it will run for thousands and thousands of rounds. The SWAT magazine article about the filthy 14 rifle went over 28,000 rounds with out cleaning. The military Arms channel has a BCM rifle that is approaching 10,000 rounds without lube or cleaning with zero malfunctions. The myth of (it sh@ts where it eats) and (the AR needs to be kept spotless) to function needs to be laid to rest once and for all, like staggered gas rings. A simple wipe down and reapplying lube is all that is needed after firing hundreds, if not thousands of rounds.