TFB Armorer's Bench: Installing a Dlah Designs Flush Optics Plate

Welcome everyone to the TFB Armorer’s Bench! As mentioned in the little blurb below, this series will focus on a lot of home armorer and gunsmith activities. In this article, I decided to go over a simple task that could be potentially overwhelming to the uninitiated. From the title you can deduce I am talking about installing the Dlah Designs Beretta 92 RDO flush fit optics plate. Dlah or Dylan as you may know him was nice enough to allow me to review his well-made optics plate. I figured before a full review I should elaborate on the installation. That being said, let’s dive right into installing the Dlah Designs Beretta 92 RDO Flush Fit Optics Plate!
Dlah Designs Related TFB Content:
TFB Armorer’s Bench: Installing a Dlah Designs Flush Optics Plate
Here, we at TFB hope to inform, entertain, and even inspire any would-be gunsmith or armorer out there. Ideally, with the information I provide and with the help of our sponsors, you can have some useful knowledge pertaining to the conservation and improvement of firearms technology while at the same time sharing experiences and teaching each other new tips and tricks along the way in the comments. Digging deep into what it is to be an armorer or gunsmith has significance but what is important is what those people do to show they’ve earned that title. I am happy to share my experiences and knowledge and hope it is informative!
Make your personal safety a priority:
- Practice proper gun safety. Always make sure before the firearm hits your bench that it is unloaded and safe to be handled.
- Wear the proper safety equipment. The main one would be safety glasses (decent ones) since parts are often under spring tension and you may work with high RPM tools. Other honorable mentions would be latex gloves or a respirator when working with potentially harmful solvents and oils. Also hearing protection when working with loud machinery or test-firing firearms.
- Modifications, alterations, and customizations will void your firearm’s warranty 9.5 times out of 10. Please take that into consideration before attempting any at-home gunsmithing.
- If you are unsure about proper safety practices, disassembly procedures, or warranty standards, stop, put down the tools, and consult a competent gunsmith.
Pre Dlah Designs RDO
I have had my personal Beretta 92X RDO for over a year now and have really enjoyed it. That is putting it lightly. It is my go-to handgun when I want to have a good time and feel confident in my shooting. I have had an optic mounted almost as long as I have had it and as you can probably see, the Beretta brand mount for the 92 is pretty thick and chunky.
This is not laziness on Beretta’s part. Looking at the geometry of the slide of a Beretta 92 you can easily see that it would be difficult to mount an optic. It is rounded rather than flat like a lot of modern handguns. So cut it flat right? Not quite. The Beretta 92 has an exposed firing pin block. When the trigger is pulled the firing pin block raises from the top of the slide. This presents the problem of putting a plate and the block hitting the plate.
The creative solution on Beretta’s part was cutting flats in the slide and making space for the firing pin block in the thick plate. Despite the chubby nature of the plate, the optic does not stick up uncomfortably high. The stock Beretta plate works perfectly well but if it was thinner I would not complain…Enter the Dlah Designs 92 RDO Flush Plate!
Installing The Dlah Designs 92 RDO Flush Plate
This specific optics plate by Dlah is for the RMR/Holosun C footprint. Along with the plate, there are three sets of two screws (5mm, 8mm, 10mm) and a flush-fit firing pin block. The RMR I am using uses 10mm screws.
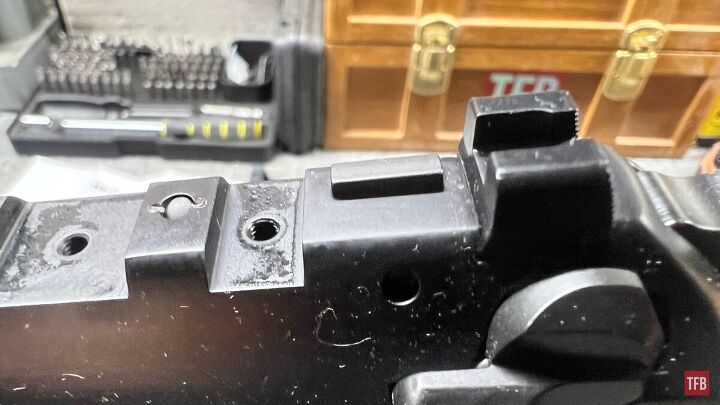
The Dlah instructions do not go over changing the firing pin block. In order to do this, we need to put on some safety glasses and punch out the pin shown below. This all needs to be done before mounting the new plate. Take the slide off for easier manipulation and punch out the pin.
Note: Be careful of the firing pin block and firing pin block spring. They have the potential to shoot out the bottom of the slide.
Remove the firing pin block and firing pin block spring.
Here you can see the difference between the stock Beretta firing pin block and the Dlah Designs one. Dlah shaves the meat on one side almost to the firing pinhole.
Reinstalling is quite simple. If you follow TFB Armorer’s Bench, you know the grease on the spring trick. This helps it stick in its proper place and lubricate and protect it.
With the block inserted, the pin can be put back into place. As you can see, with the Dlah Designs firing pin block installed it sits below flush when it is at rest.
This is an example of when the trigger is pulled and the block moves upwards.
The 5mm screws work great to mount the new plate to the slide. The instructions suggest 10-12 inch pounds.
Installing the optic is a breeze. It fit perfectly onto the plate and the provided 10mm screws threaded great.
Lastly, I racked the slide pretty aggressively to make sure nothing came loose.
All Said and Done
There you have it! My installation was abridged, to say the least. Dlah does a great job going in-depth and covering the spectrum of potential problems with some good information in his instructions.
A full review is on its way soon!
As always, thank you for reading TFB! Be safe out there, have fun while shooting, and we will see you next time for the TFB Armorer’s Bench! Also, let us know what you think in the comments below! We always appreciate your feedback.

Writer | TheFirearmBlogWriter | AllOutdoor.comInstagram | sfsgunsmithOld soul, certified gunsmith, published author, avid firearm history learner, and appreciator of old and unique guns.
More by Sam.S


Comments
Join the conversation
This begs a question: why didnt Beretta modify the firing pin safety parts this way from the factory? It seems to be a very functional solution.
I'm continually impressed by how many companies other than Beretta manages to make great solution optics mounting