TFB Armorer's Bench: Mounting an Optic on an X-Frame Revolver

Welcome everyone to TFB Armorer’s Bench! As mentioned in the little blurb below, this series focuses on a lot of home armorer and gunsmith activities. In this article, I am looking at a straightforward but often questioned process - mounting an optic on Smith & Wesson's X-Frame revolvers. Using the new Model 350 as our example, we'll walk through the steps of mounting a red dot using the Weigand mount system. While it might seem intimidating to modify such a substantial revolver, the process is surprisingly straightforward with the right tools and attention to detail.
Optics on TFB Armorer’s Bench Reading @ TFB:
- TFB Armorer's Bench: Installing XS Sights on The Magpul MBUS
- TFB Armorer's Bench: Using The Wheeler Armorer's Pistol Sight Tool
- TFB Armorer's Bench: Installing a Dlah Designs Flush Optics Plate
- TFB Armorer's Bench: Beretta 92X RDO Optic Installation
- TFB Armorer's Bench: Techniques and Types – Boresighting
TFB Armorer’s Bench: Mounting an Optic on an X-Frame Revolver
Here, we at TFB hope to inform, entertain, and even inspire any would-be gunsmith or armorer out there. Ideally, with the information I provide and with the help of our sponsors, you can have some useful knowledge pertaining to the conservation and improvement of firearms technology while at the same time sharing experiences and teaching each other new tips and tricks along the way in the comments. Digging deep into what it is to be an armorer or gunsmith has significance but what is important is what those people do to show they’ve earned that title. I am happy to share my experiences and knowledge and hope it is informative!
Make your personal safety a priority:
- Practice proper gun safety. Always make sure before the firearm hits your bench that it is unloaded and safe to be handled.
- Wear the proper safety equipment. The main one would be safety glasses (decent ones) since parts are often under spring tension and you may work with high RPM tools. Other honorable mentions would be latex gloves or a respirator when working with potentially harmful solvents and oils. Also hearing protection when working with loud machinery or test-firing firearms.
- Modifications, alterations, and customizations will void your firearm’s warranty 9.5 times out of 10. Please take that into consideration before attempting any at-home gunsmithing.
- If you are unsure about proper safety practices, disassembly procedures, or warranty standards, stop, put down the tools, and consult a competent gunsmith.
Required Components and Tools
For this installation, we're using a Weigand Scope Mount designed for Smith & Wesson K, L, N, and X Frame revolvers. Our test platform is the S&W Model 350, and we're mounting an AT3 ARO Mini with an RMSc footprint.
The tool selection for this job is straightforward but specific. You'll need an Allen wrench set for the various mounting screws, a flat head screwdriver for the factory sight screws, and a torque driver capable of accurate inch-pound measurements. While many torque drivers will work, having one that can accurately measure in inch-pounds is crucial - especially for the mount screws where the 13 inch-pound spec can be critical for proper lockup.
For surface prep, you'll need a proper degreasing agent. While any degreaser might seem fine, using something that leaves no residue like brake cleaner or acetone will ensure proper Loctite adhesion. Speaking of which, blue Loctite is specifically called for in this application - don't substitute other thread lockers without good reason.
Rear Sight Removal Process
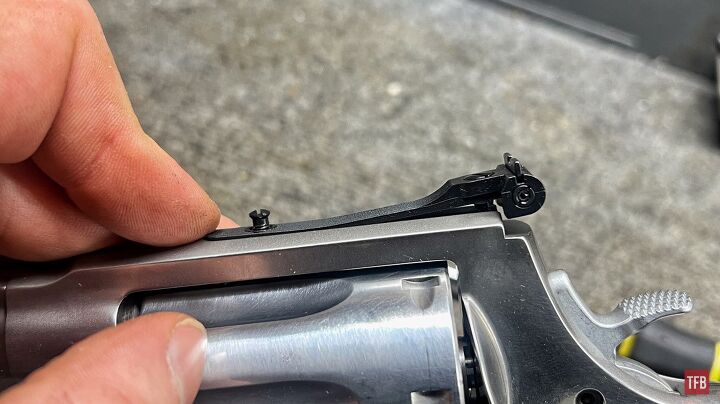
The rear sight removal on X-Frame revolvers requires attention to detail. There are two key screws: a front tension screw and a rear elevation screw. The rear screw interfaces with a small square block that sits in a slot in the frame. This block is easily lost if you're not paying attention during disassembly.
A smart approach is to set up a clean workspace with a parts mat before starting. The small square block in particular has a talent for disappearing if dropped. Start by removing the front screw first - this releases the tension on the assembly. Once loosened, you can address the rear elevation screw, but here's a tip: you may not need to fully remove this rear screw. Once the front is loose, the entire sight assembly including the square block can be slid backward out of its slot.
Watch for any burrs or damage on the sight base during removal. While uncommon, any damage here could affect how the new mount sits.
Installing the Weigand Mount
The Weigand mount installation requires careful attention to cleanliness and torque specs. Begin with thorough degreasing of all screws and threaded holes. Any oil residue will prevent proper Loctite adhesion.
Installation steps:
- Clean all mounting surfaces thoroughly with degreaser
- Allow surfaces to dry completely
- Apply blue Loctite to mounting screws
- Install the mount using supplied 6-48 screws
- Torque to 13 inch-pounds using a 3/32 Allen wrench
The mount's oversized recoil lug helps prevent shifting even under magnum recoil. Don't skip the proper torque steps here - this is what prevents zero shift during firing.
Mounting the AT3 ARO Mini
With the base secured, optic mounting follows a similar attention to detail:
- Clean all mounting surfaces thoroughly
- Verify proper alignment before applying thread locker
- Install the optic using supplied screws
- Torque optic-to-picatinny mount screws to 10-12 inch-pounds
- Secure the picatinny interface to approximately 15 inch-pounds
Take time to align the optic properly before final tightening. While the mount provides good adjustment range, starting with proper alignment makes zeroing easier. Check that the optic sits level relative to the frame - any cant here will make zeroing more difficult.
Performance Testing
After installation, function testing showed no signs of loosening or shift. The mount remained solid through several range sessions, and proper torque specs proved their worth. The AT3 ARO Mini maintained zero throughout testing, with the Weigand mount's solid lockup proving effective even on the substantial X-Frame platform.
For those interested in moon clip options, we also tested TK Custom moon clips alongside factory options. Despite claims of improved rigidity, both performed similarly well with no bending issues noted.
There you have it - mounting an optic on an X-Frame revolver isn't as daunting as it might seem. The key points are maintaining proper torque specs and keeping track of those small parts during sight removal. As always, thank you for reading TFB's Armorer's Bench! Be safe out there, have fun while shooting, and we will see you next time. Let us know your experiences with mounting optics on revolvers in the comments below!

Staff Writer: TheFirearmBlog & AllOutdoor.com | Certified Gunsmith | Published Author | Firearm History Enthusiast
More by Sam.S



















Comments
Join the conversation
Was there not a plate mount available for this? When I put an RMR on my N frame 629 I installed a plate made for that red dot and it sat quite a bit lower. I'm not sure I understand the need to put that high pic rail mount when a much lower option should be available. If it's not, I'd rather choose a sight that does have a flat mount instead of mounting something on that revolver equivalent of a high rise manifold.
Also, red dots on revolvers are great for hunting or targets but there is no co-witness or anything remotely close to one, so fast acquisition requires a Jerry Miculek level of practice to find the dot fast enough to keep Yogi from putting you in his pic-a-nic basket Boo Boo. Considering how high the red dot sight is in this article you might be doomed if carrying for big critter defense. That's the reason I took mine off, it's great for hunting and target shooting but it greatly increases the length of time it takes to get on target.